Introduction
Welcome to the documentation. To access the other sections, go to:
It is recommended that you start with the onboarding to understand how the stack works and start developing as quickly as possible.
🔍 Found a typo or error? Report it here!
Onboarding
What you will be able to do at the end of this tutorial:
- Launch a simulation
- Create your own strategy
- Play against your AI and enter the ranking
- Learn how to develop and contribute to the project (branch, commit, PR, etc.)
The onboarding is organized to be completed in 5 days, with daily blocks of 1h30.
- Day 1: Understand how the project works (theory) & setup (install, compile, serve docs)
- Day 2: Understand the basics of the programing language
- Day 3: Understand, run, and modify the current strategy.
- Day 4: Learn how to develop. Create your branch, commits.
- Day 5: Develop your OWN strategy and test it.
Click here to start the first part:
Theory
Theory
Section Summary
But first, let’s understand how the current project works in theory.
Understanding the Project
It is recommended that as you read this tutorial, you explore the different files of the project yourself. Our repository is generally divided into a few key areas:
├── control/        # Main code for robot control, vision, and strategy
├── docs/           # You are here! Source files for the mdBook documentation
├── firmware/       # Embedded systems code for the physical robots
├── simu/      # (TODO) Simulator environment and integration components
└── logs/           # Real-time application execution logs
control: The core path planning, geometry utilities, and behavior tree execution.simu: The integration code bridging the simulator environment to our main strategy loop.docs: The source code for these Onboarding pages.
(todo) Expand detailed explanation of the current folder usage and structural dependencies…
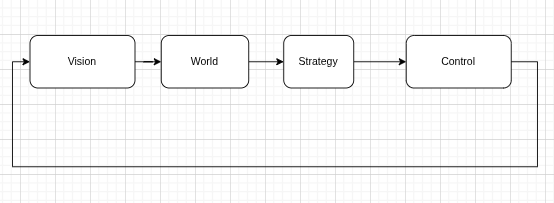
Pipeline
Imagine your robot is a real soccer player. For it to work, its “brain” (the code) needs to process information in a logical order, like an assembly line.
(todo) Provide a detailed code snippet and pipeline loop explanation specific to our newly adopted integration structure…
Vision (The Eyes)
The robot receives images from up to 4 different cameras on the ceiling of the field. The vision system processes this computer program data and generates the raw positions of the ball and players (SSL vision). Our job is to mix and match the data from the different cameras, parse (they might not always be in order). And pass it to the next stage.
State (The Mental Map)
The system takes this noisy data and filters our view into an established “ground truth” to get the most accurate position of the ball and players It structurally maps out what is happening on the field right now.
Strategy (The Coach)
This is where the high-level intelligence—implemented using Behavior Trees—decides what the robot should do. For example: if the ball is close, the robot should approach and kick; if defending, it should block a passing lane.
The output of this layer is a desired objective, such as a target position, velocity, or action.
Control (The Brain)
This layer is responsible for translating high-level objectives into precise, physically feasible motion.
Given a target (e.g., position or velocity), the control system computes how the robot should move over time to achieve it. This includes:
- Trajectory tracking: Converting targets into smooth motion
- Feedback control (e.g., PID): Continuously correcting errors between desired and actual state
- Kinematics & dynamics: Mapping global motion (x, y, rotation) into wheel velocities
- Constraints handling: Respecting limits like maximum speed, acceleration, and motor capabilities
The control layer does not decide what to do—it ensures that what was decided is executed as accurately and robustly as possible.
Firmware (The Muscles)
This layer runs on the robot and directly interfaces with the hardware.
It receives low-level commands (e.g., wheel velocities) and is responsible for:
- Driving motors using PWM signals
- Reading sensors (encoders, IMU, etc.)
- Applying very fast local control loops when necessary (e.g., motor-level PID)
In short, while the control layer computes how the robot should move, the firmware ensures that the motors actually follow those commands in the real world.
Coach vs Play vs Skills
(todo) This section will be covered in later documentation explicitly detailing the strategy modules.
You are ready to start the practice section. Click here to continue:
Practice
Below are the practical steps organized by days:
Day 1 - Setup
1. Install Docker
Add Docker’s official GPG key:
sudo apt update
sudo apt install ca-certificates curl
sudo install -m 0755 -d /etc/apt/keyrings
sudo curl -fsSL https://download.docker.com/linux/debian/gpg -o /etc/apt/keyrings/docker.asc
sudo chmod a+r /etc/apt/keyrings/docker.asc
Add the repository to Apt sources:
sudo tee /etc/apt/sources.list.d/docker.sources <<EOF
Types: deb
URIs: https://download.docker.com/linux/debian
Suites: $(. /etc/os-release && echo "$VERSION_CODENAME")
Components: stable
Signed-By: /etc/apt/keyrings/docker.asc
EOF

sudo apt update
Install Docker packages:
sudo apt install docker-ce docker-ce-cli containerd.io docker-buildx-plugin docker-compose-plugin
Add yourself to the Docker group to run Docker commands without sudo:
sudo groupadd docker
sudo usermod -aG docker \$USER
newgrp docker
Note: You should reboot your computer after doing this to ensure group changes are fully applied.
2. Allow Docker to Access the X Server
To allow GUI applications (like grSim) to run from the Docker container, allow Docker to access the X server:
xhost +local:docker
To make it permanent, add it to the end of your ~/.bashrc:
echo "xhost +local:docker > /dev/null" >> ~/.bashrc
source ~/.bashrc
3. Build the Image
Build the container image with the simulator (grSim), Python code, C++ embedded tools, and Rust documentation tools. This might take a few minutes as it builds the environment from scratch, layer by layer (defined in the Dockerfile). Subsequent builds will be much faster.
docker build .
4. Run the Environment
The command to start the container is:
docker compose run --rm --name my_ssl dev
Check if the installation was correct by running the test script:
chmod +x test_env.sh
./test_env.sh
5. Local Documentation
To generate and serve the local documentation alongside your code, run:
mdbook serve ./docs
Then, open your browser and navigate to http://localhost:3000 to view the documentation.
6. Launching grSim
To run the simulator and other tools, open two terminals and attach them to the running container:
docker exec -it my_ssl /bin/bash
Then, inside the container, open grSim:
grSim
You should see this screen:
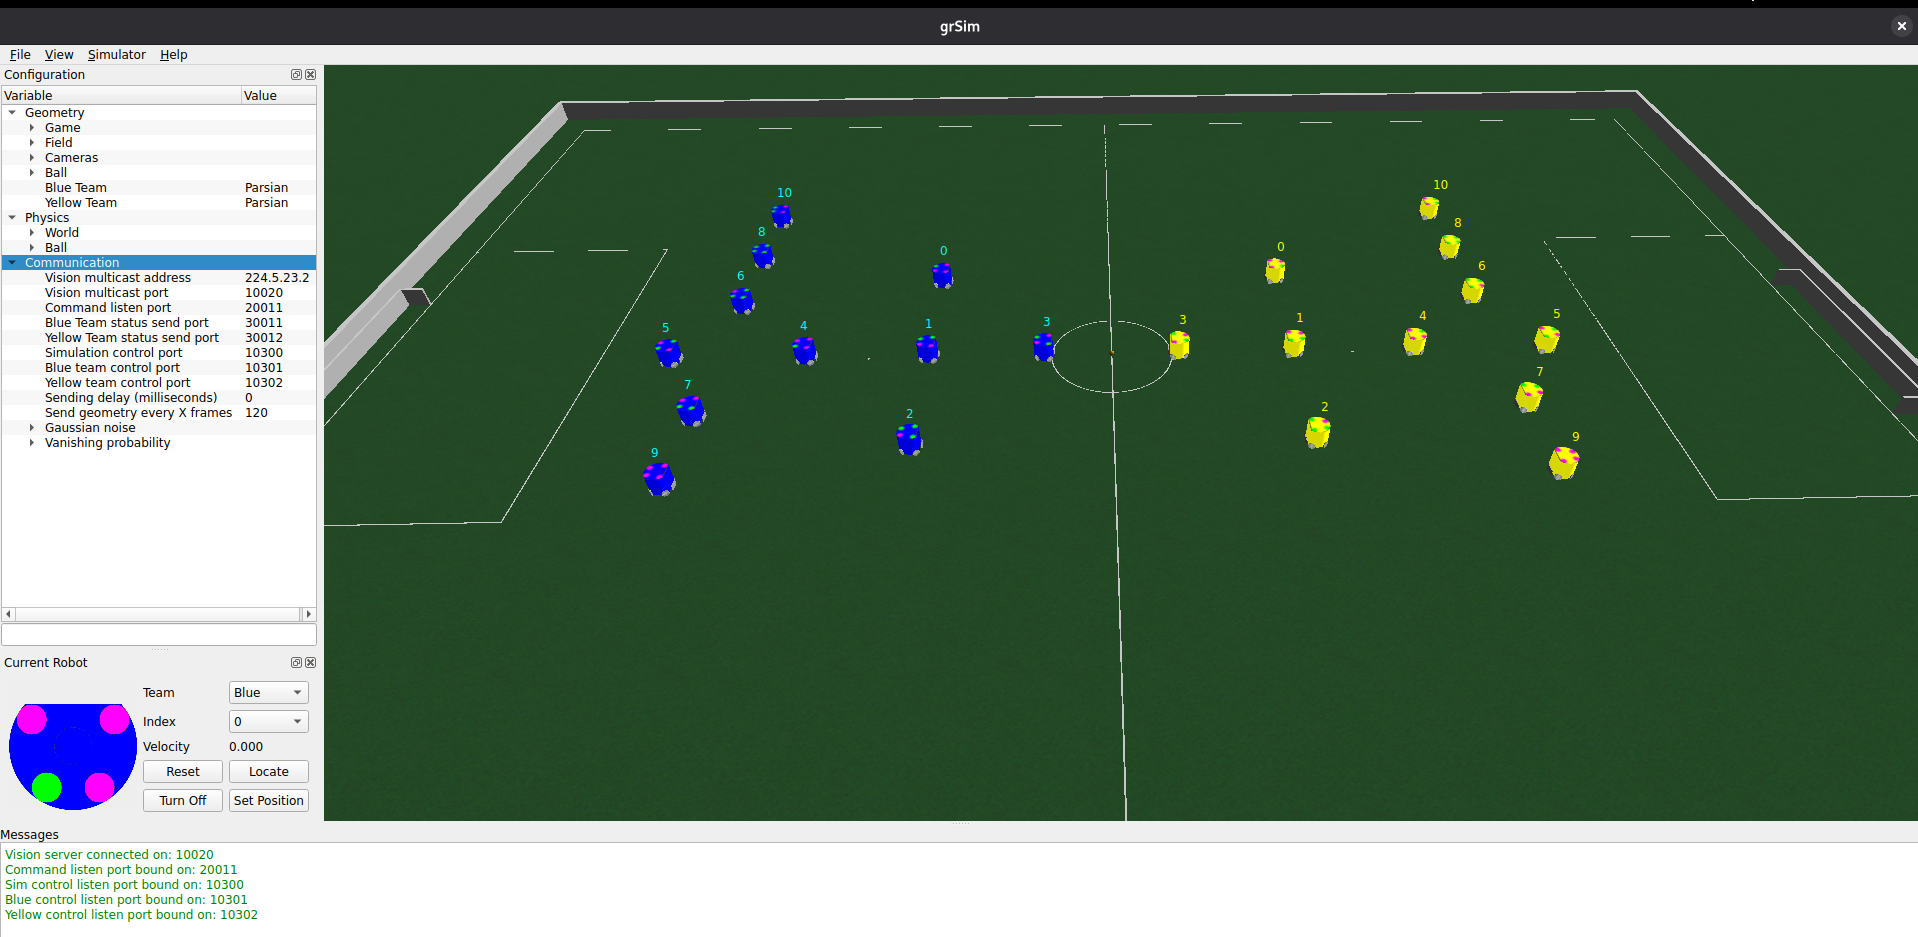 ⚠️ (If you don’t see it, try running
 xhost +local:docker in your host terminal first.)
Bravo! The setup is done. We will soon start creating our own strategies! You can now proceed to Day 2.
Day 2: Programming Practice
todo
You can now proceed to Day 3.
Day 3: Strategy Basics
Today is about understanding, running, and modifying the current strategy in the codebase.
todo
You can now proceed to Day 4.
Day 4: Development Workflow
Today you will learn how to contribute to the project by creating branches and making commits according to our standards.
(todo - add actual commands to follow along)
Contribution Workflow
-
Create a branch: When starting a new task, always create a new branch from
main. Keep the name descriptive:git checkout -b feature/your-feature-name -
Make commits: Write clear and descriptive commit messages for your changes, using the format described in style:
git add . git commit -m "add: new behavior for striker robot" -
Push and Pull Request: Once you are done, push your branch and open a PR (Pull Request) on the repository:
git push origin feature/your-feature-nameA pull request should not modify too many files or add too many features at once. For this initial learning phase, your pull request should not exceed 300 lines of code.
You can now proceed to Day 5.
Day 5: Develop and Test Your Own Strategy
Today is the final day of your onboarding! It is time to put everything together.
The Final Challenge
Your goal is to improve the base strategy and test it in the simulation.
- Plan your strategy: Define how your robots should position themselves, pass the ball, or handle defense.
- Implement: Code the changes in the
strategylibrary. - Test in Simulation: Launch
grSimand watch your strategy play out. - Refine: Fix bugs and improve your structural logic based on visual observation.
Once your strategy is working continuously without panicking, you can open a pull request so we can review your work. After implementing any feedback, you will have successfully completed your onboarding. You will then be ready to start collaborating and climbing the project rankings!
Architecture
This section contains the high-level design and decision records for the SSL codebase.
(todo)
Architecture Decision Record (ADR)
Problem Definition (dec 2025)
The project currently faces several critical challenges:
- Lack of long-term vision and task decomposition.
- Lack of an architecture definition.
- Lack of documentation.
- Lack of structure in code version management.
Objective: The chosen architecture must facilitate the transfer of knowledge to new students, allowing them to integrate into the workflow quickly. This structural shift must be completed and implementable within 5 months, with the primary goal of winning the B series of the RoboCup 2026.
Principles
To meet our objectives, the architecture is designed around the following core principles:
- Simplicity: The system must be straightforward to navigate, making onboarding and knowledge transfer easy (critial for an undergraduate team).
- Reusability: Components should be written so they can be reused across different modules, particularly keeping VSSS (Very Small Size Soccer) in mind.
- Modularity and Testability: It is crucial that parts of the strategy and control loop can be isolated and tested independently. Even from hardware, SSL-vision and GameController.
- Collaborative Development: Contributions should be made collaboratively, ideally in pairs or small groups, to prevent knowledge silos and promote continuous knowledge sharing across the team.
Decision Log
| Title | Description | Decider | Date |
|---|---|---|---|
| Template | Brief description of the core decision and its rationale. | Name | YYYY-MM-DD |
| Programming Language Choice | Transitioned to Python & C++. C++ for core high-performance parts, advantages of a typed and compiled language. Retained Python structure explicitly for AI, neural networks, and ease of onboarding. | ? | 12-2025 |
| Behavior Tree | Adopted Behavior Trees for the strategy logic to make the decision trees scalable, modular, and easier to debug for newcomers. | ? | 03-2026 |
(Add new decisions here following the template above)
Style
-
Folders: lowercase
-
Commit messeges:
| Type | Use Case | Example |
|---|---|---|
| feat | A new feature for the robot or AI. | feat: add open loop circular dribbling |
| fix | A bug fix (logic, math, or crash). | fix: correct robot orientation wrap-around |
| refactor | Code change that neither fixes a bug nor adds a feature. | refactor: simplify vector math in navigation |
| style | Changes that do not affect the meaning of the code. | style: run clang-format on vision module |
| test | Adding missing tests or correcting existing tests. | test: add unit tests for geometry utils |
| docs | Documentation only changes. | docs: update onboarding guide for new members |
| chore | Updating build tasks, package configs, etc. | chore: add pre-commit hooks to repo |
| perf | A code change that improves performance. | perf: optimize collision detection loop |
Others
Python Doc
Resources
- How does a SSL match work?
- What are the technical details?
- How does ssl-vision work?
- How to write cool documentations (just like this one): rustdoc
- Awesome Python Robotics: Using python to move robots, path planning, control…
🔍 Found a broken link? Report it here!